Sign Up
- Step 1: Open the Website*
- Visit www.foodnerdpos.com
- Click the “Join Now” button at the top right corner of the page.

- Enter the following fields in the form:
- First Name*
- Last Name*
- Email Address*
- Phone Number*
- Create the password and confirm it.
- Select your country from the “Country” drop-down.
- Mark the given Captcha.
- Click "Continue".

- A 4-digit PIN code will be sent to your given email/number.
- On email, the provided PIN code will look like this:

- Note: If you didn’t find the verification email in your given email, check your spam folder.
- On mobile, the sent code will look like this:

- Enter your 4-digit PIN code
- Click the “Continue” button.
- If you didn’t receive an email, click the “Resend Verification Code” link

- Enter the location name in the “Location name” field.
- Provide your phone number in the “Phone” field.
- Choose your time zone from the “Select Timezone” dropdown list.
- Select your currency from the “Select Currency” dropdown list.
- Provide the following address fields:
- Street Address 1
- Street Address 2 (optional)
- Choose your country from the “Country” dropdown list.
- Choose your state from the “State” dropdown list.
- Select your city name from the “City” dropdown.
- click the “Continue” button.

- Check the details of each package and select any of the following preferred plans:
- Basic
- Standard
- Pro

- Currently, there’re 12 addons available which can be selected as per the requirement
- Upon selecting the addons, the dues will be added to the user’s cart automatically

- Review your payment details in the cart for the selected package/Addons
- Select any of the following payment methods:
- Stripe
- JazzCash
- Cash
- Click the “Submit” button

- Visit www.foodnerdpos.com/manager/login
- Enter your registered email address
- Type the password, set during the signup process
- Mark the “Remember me” check box to save login credentials
- Click “Login”


Login
- Step 1: Open the Website*
- Visit www.foodnerdpos.com
- Click the “Login” button in the top-right corner of the navigation bar.

- Step 2: Enter Your Account Credentials
- Input your registered email.
- Enter your password.
- Click the “Login” button.

- Upon successful login, you will be directed to the dashboard.

- Note: Don’t have a Foodnerd account? Take a look at the signup guide www.foodnerdpos.com/manager/join.
- Go to www.foodnerdpos.com/manager/login
- Select the “Forgot Password?” link.

- Enter your registered email.
- Click “Send me reset password instructions.''

- Check your email for instructions.
- Click on the “Change Password” link.

- You’ll be redirected to the password change page.
- Enter a new password.
- Confirm it in the “Confirm new password” field.
- Click “Change my password”.

Change Language on Foodenerd
- Step 1: Click Language Option
- Click on the language option at the top right side of the navigation bar.

- Step 2: Choose Language
- Choose any of the following languages to apply:
- Danish
- Arabic
- English
- French
- Urdu

Change Account Information
- Step 1: Navigate to Account Info Page
- Open the location page www.foodnerdpos.com/manager/locations
- Click the “Account Info” icon at the top right side of the navigation bar.

- Step 2: Change Name, Phone, Location
- On the Account info page, look at the “Personal Information” section that holds the user's information:
- Update any of the following fields:
- First name*
- Last name*
- Phone number*
- Update the selected location if required
- Click the “Update” button

- Enable Two-Factor Authentication
- Two-factor authentication adds an extra security layer to the account:
- Upon every login, you will receive a 4-digit PIN on your registered email address.
- After entering that PIN, you will get access to your account.
- Follow the following steps to enable two-factor authentication on the account.
- Step 1: Enable Two Factor Authentication
- Click the “Two Factor Authentication” checkbox under the “Personal Information” section
- Then, click the “Update” button

- Step 2: Enter PIN Code
- A 4-digit PIN code will be sent to your registered email address
- Enter the PIN code in the provided field.
- Click the “Continue” button.
- In case, you didn’t receive the PIN code, hit the “Resend Verification Code” option to resend it.

- On the registered email, the PIN code will look something like this:

- Change Account Password
- Follow these steps to change your account password:
- Open the “Account Info” page www.foodnerdpos.com/manager/join/edit and navigate to the “Change Password” section.
- Enter your current account password in the “Current Password” field.
- Enter your new password in the “New Password” field.
- Confirm your new password in the “Confirm Password” field.
- Then, click the “Update” button.

Add New Location/Store
- Step 1: Add a New Location
- Open the location page www.foodnerdpos.com/manager/locations
- Click the “New Location” option on the navigation bar.

- Enter the location name in the “Location name” field.
- Provide your phone number in the “Phone” field.
- Choose your time zone from the “Select Timezone” dropdown list.
- Select your currency from the “Select Currency” dropdown list.
- Provide the following address fields:
- Street Address 1
- Street Address 2 (optional)
- Choose your country from the “Country” dropdown list.
- Choose your state from the “State” dropdown list.
- Select your city name from the “City” dropdown.
- Click the “Continue” button.

- Basic
- Standard
- Pro

- Addons are the extra features apart from the subscription plan.
- Scroll down and choose desired addons with some additional cost.

- Review the total payment in the cart for the selected plan/addons.
- By default, the payment is “Cash” for adding a new location/store.
- Click “Submit”.

Employees/HRM
- Access Employee/HRM Page
- The employee/HRM section manages the salary of all employees based on the set commission or flat percentage amount against orders. The commission is the fixed amount set for the employees against the order. While the percentage/flat is the specific amount of percentage or price from the total order’s price. You can add a new employee, search, edit, delete, view payment, and settle payment for the existing employee record.
- Access Employee/HRM Page
- Step 1: Choose Location/Store
- Go to the location page www.foodnerdpos.com/manager/locations
- Choose the particular location/store.

- Step 2: Open Employees/HRM
- Click the “Sidebar” icon at the upper left corner of the page.
- Click the “Employees/HRM” tab in the opened sidebar.
- Then, click the “All” option to see all employees.

- The “Manage Employees” page will open and will show these employee's pieces of information in the table:
- Name
- Phone
- Order (All Orders)
- Total Commission (Employee's Total Earned Commission)
- Percentage/Flat (Given Percentage or flat price against order)
- Due (Total Dues of the Employee)
- Paid (Total Paid amount to the employee)
- Actions (To Perform Edit, Delete, View Payment, and Settle Payment Operations)

- Add New Employee
- Follow these steps to add new employees to the table.
- Step 1: Add a New Employee
- Click on the “New Employee” button at the top right side of the page

- Step 2: Enter Personal Information*
- Enter the employee’s name in the “Name” field.
- Set or enter the employee's “Date of birth”.
- Total Commission (Employee's Total Earned Commission).
- Enter the Phone number in the “Phone” field.

- Step 3: Enter Company Information*
- Enter the joining date in the “Joining Date” field.
- Enter the employee designation in the “Designation” field.

- Step 4: Enter Commission Information*
- All fields in the “Commission Information” tab are compulsory to mention:
- Enter the basic pay of the employee in the “Basic Pay” field.
- Enter the commission type (Flat Commission or Percentage Commission) from the “Select Commission” dropdown.
- Enter the commission rate in the “Commission rate” field.

- Step 5: Enter Address
- All fields in the “Address” section are compulsory except “Address Line 2”:
- Enter the addresses in the following fields:
- Address Line 1*
- Address Line 2
- Select the “Country”, “State”, and “City” from the dropdown.
- Click the “Submit” button.

- Employee Search Filter
- The employee search filter will search specific records of the employee based on the employee's name.
- Enter the name of the employee in the “Employee name” field.
- Click the “Search” button.
- The search will display the specific record of the employee.

- Step 1: Edit Employee
- Follow these steps to edit the employees details
- Open Edit Form
- Locate the specific record of the employee.
- Click the “Edit” link in the “Actions” tab.

- Step 2: Edit Personal Information
- Update the name of the employee in the “Name” field.
- Update the date of birth in the “Date of birth” field.
- Update the national identity number in the “CNIC” field.
- Update the Phone number in the “Phone” field.

- Step 3: Edit Company Information
- Update the joining date in the “Joining Date” field.
- Update the employee designation in the “Designation” field.

- Step 4: Edit Commission Information
- Update the basic pay of the employee in the “Basic Pay” field.
- Update the commission type (Flat Commission or Percentage Commission) from the.
- “Select Commission” dropdown
- Flat Commission is the specific price against every order\
- Percentage Commission is the specific percentage of the total amount of orders
- Update the commission rate in the “Commission rate” field.

- Step 5: Edit Address
- All the fields in the “Address” section are editable:
- Update the addresses in the “Address Line 1” and “Address Line 2” fields.
- Update the “Country”, “State”, and “City” status.
- Click the “Submit” button.

- The particular record will be updated!
- Delete Employee
- Locate the specific employee record.
- Click the “Delete” option in the “Action” column.

- The particular customer record will be deleted!
- Caution: Be careful before using the delete functionality because the process is irreversible.
- View Employee Payment
- Locate the Specific record of an employee.
- Press the “Payments” option under the “Actions” tab.

- The following employee's payment will be listed with these pieces of informations:
- Date (Joining Date of the Employee)
- Total amount
- Already paid
- Paid amount
- Pending amount
- Payment mode

- Export Employee Payment Records in CSV, XLSX, and PDF
- View the specific employee payment record
- Click on any of the desired export formats (CSV, XLSX, or PDF ) at the bottom right side of the record.

- Settle Employee Payment
- Follow the provided steps to settle the employee payment
- Step 1: Open Settle Payment Page
- Locate a specific record of an employee.
- Hit the “Settle” option under the “Actions” tab.

- Step 2: Settle Payment
- Enter the date in the “Date” field.
- Update the total amount in the “Total amount” field.
- The “Already paid” and “Pending amount” will be filled in automatically.
- Enter the paid amount in the “Paid amount” field and the “Pending amount” field will be adjusted accordingly.
- Select any of the following payment methods from the “Mode of Payment” dropdown.
- Cash Credit, Card Bank, Deposit, Cheque, Others
- Click the “Submit” button.

Customers
- The customer page holds all the customer’s records with their order details. You can add new customers, delete, edit, or settle payments for existing customers. The settle payment feature is for the customer who pays partial dues of their orders and pays the remaining amount later.
- Access Customer Page
- Step 1: Choose Location
- Open location page www.foodnerdpos.com/manager/locations
- Choose a particular location/store.

- Step 2: Go to Customer Tab
- Click the “Sidebar Icon” icon at the upper left corner of the page.
- Scroll down in the opened sidebar and click the “Customers” option.

- Upon doing so, the “Manage Customer” page will open with the following features and information:
- Search Filter
- Customer’s Table
- The customer’s table shows the following information about the customer:
- Name
- Customer’s Table
- Address
- Loyalty Points (Customer-earned loyalty points)
- Due Amount
- Phone Number
- Verified Status
- Actions (Delete, Edit, and Settle Payments)

- Add New Customer
- Step 1: Add Customer
- Click the “Add Customer” button at the top right side of the page

- Step 2: Enter Customer Details
- Enter the following required fields for the customer:
- Name
- Phone Number
- Provide the following address fields:
- Door Name
- Street Address 1*
- Street Address 2
- Select the “Country”, “State”, and “City” from the dropdown
- Click the “Create Customer” button

- The particular customer will be added to the record!
- Customer Search Filter
- The customer search filter shows the specific record from the table based on the following information:
- Name, Email, Phone
- Search Customer By Name
- Enter the customer name in the “Name Contains” field.
- Click the “Search” button.

- Search Customer By Email
- Enter customer email in the “Email Contains” field.
- Click the “Search” button.

- Search Customer By Phone Number
- Enter the customer's phone number in the “Phone Contains” field.
- Click the “Search” button.

- Delete Customer Record
- Locate the specific customer record from the table.
- Click on the “Delete” icon under the “Actions” column.

- The specific customer record will be deleted!
- Caution: Be careful, pressing the delete icon will immediately delete the record without confirmation and the process is irreversible.
- Edit Customer
- Step 1: Go to Customer Edit Form
- Locate the specific customer record in the table
- Click the “Edit” icon under the “Actions” column

- Step 2: Fill out the Form and Create Customer
- Edit any of the following customer’s details:
- Name, Email, Phone number
- Update the address fields “Door Name”, “Street Address 1”, and “Street Address 2”
- Select the updated “Country”, “State”, and “City” from the dropdown
- You can also add a new address with the help of the “Add Address” option
- Click the “Create Customer” button

- Customer Settle Payment
- Step 1: Go to Settle Payment Page
- Locate the specific customer record from the table
- Click the “Settle Payment” link under the “Actions” column

- Step 2: Fill the Form
- Select the specific order from the “Select Order” dropdown
- Select the particular drawer from the “Select Drawer” dropdown
- Enter the customer’s paid date in the “Paid at date” field
- The “Total amount”, “Already paid”, and “Pending amount” will be filled in automatically
- Enter the “Paid amount” in the given field and the pending amount will automatically be updated accordingly
- Select any of the following payment methods from the “Mode of payment” dropdown:
- CARD, CASH, Card, Easypaisa, GiftCard, JazzCash, Paypal, Quickpay, Stripe, UBL
- Mention the “Additional notes” if required
- Click “Submit”

- Export Customer Records in a CSV, XLXS, and PDF
- Scroll down to the bottom of the customer detail page
- Click any of the desired formats (CSV, XLSX, and PDF) options at the bottom left side of the page

- The customer record will be exported in the chosen format!
Drawers
- Drawers are simply virtual cashiers that hold order records, processed with the cash payment method only. It manages all the incoming and outgoing cash in your store. On this page, you can add a new drawer, view each order's details, search specific drawer’s order reports, and add manual cash in and out entries to the business amount. Apart from that, you can also export the order’s details report in CSV, XLSX, and PDF format.
- Access Drawers
- Follow the provided steps to access drawers.
- Step 1: Choose Location/Store
- Open location page www.foodnerdpos.com/manager/locations
- Choose your particular location/store

- Step 2: Open Drawers
- Click the “Sidebar Icon” at the top left corner of the page
- Click on “Drawers” in the opened sidebar menu

- The drawers report page will be opened with the following features and information:
- Search Filter
- Table with drawer information
- Add New Drawer
- In the drawers table, the following information will be available:
- The “Drawer ID”, a unique ID assigned to each drawer automatically
- The “Title”, is the name of the drawer and contains a link to the order details
- The “Amount”, is the total amount of ordered cash
- The “Date”, when the drawer was created
- The “User”, to whom the drawer was assigned

- Add New Drawer
- Step 1: Click New Drawer
- Click the “New Drawer” button at the upper right side drawer’s page

- Step 2: Fill out the Form
- A new drawer page will be opened. Fill out the “Drawer Information” form:
- Enter your “Drawer title”
- Select the available user from the dropdown to assign the drawer
- Click the “Submit” button

- The specific drawer will be created!
- Important Note:
- All subscription packages have 2 drawers support
- For an additional drawer, purchase the “Additional Drawers/Machines” addons
- View Drawers Details
- Click the “Title” link of the particular drawer in the drawer table

- You’ll see the following features and information:
- Search Filter
- Drawers Report Table
- The Drawers report table will list the following information:
- The “ID”, is a unique ID of the order
- The “Drawer”, is the drawer name
- The “Order No”, a unique customer order number
- The “Type”, defines what action is being performed on the cash
- The “Date”, is the order/cash date and time
- The “Credit”, is the incoming cash amount against the order
- The “Debit”, is the outgoing cash amount (not against the order)
- The “Payment Mode”, is the name of the payment method
- The “Notes”, a short description of the cash/order
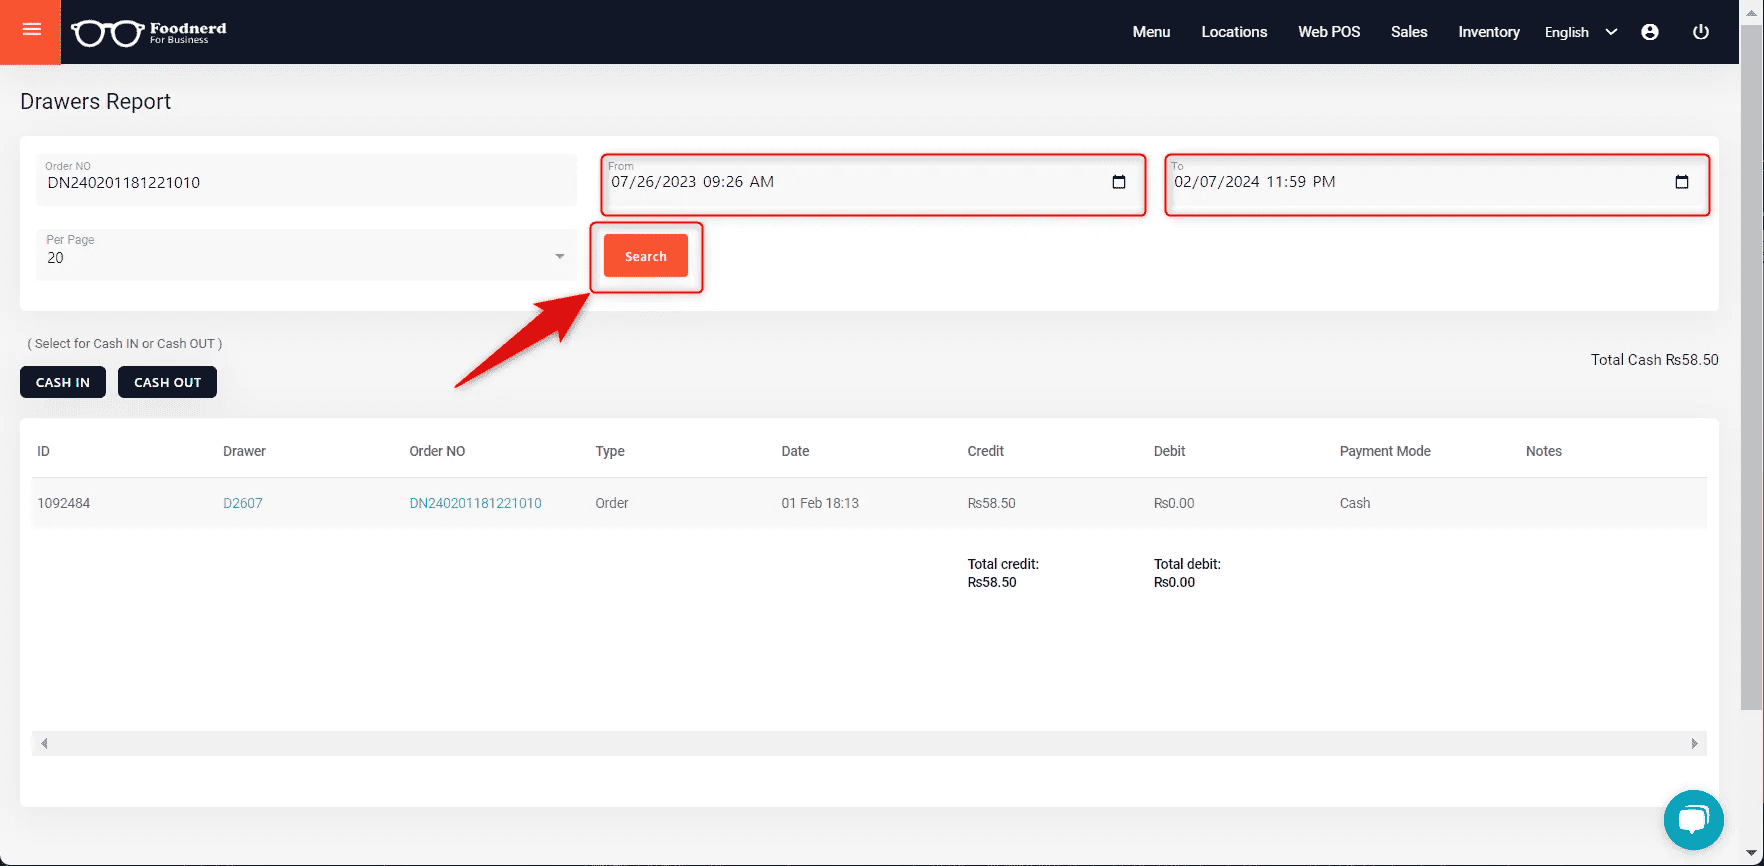
- Drawer Report Search Filter
- Drawer search filter displays the specific record from the drawer table based on the following information:
- Order No
- Time Duration
- Search Drawer Report Record By Order No
- Enter your order no in the “Order No” field
- Click the “Search” button

- Search Record for Specific Time Duration
- Choose your desired “From” and “To” date and time
- Click the “Search” button

- Manual Cash In and Out Entry
- Cash in and out is the feature used to change the business amount. Cash-in feature is used when any extra amount is added to the business amount. Cash-out is the feature used when any cash is used from the business amount.
- Cash in
- Click the “CASH IN” button.
- Enter the “Cash in amount” amount.
- Write the “Notes” which is an optional field.
- Select any of the following payment modes:
- Cash Credit, Card, Bank Deposit, Cheque, Others
- Click the “Cash in” button

- Upon doing so, the cash-in entry will be added to the table.
- Cash Out
- Click the “CASH OUT” button.
- Enter the “Cash out amount” amount.
- Write the “Notes” which is an optional field.
- Select any of the following payment modes:
- Cash Credit, Card, Bank Deposit, Cheque, Others
- Click the “Cash in” button

- Export Drawer’s Order Report in CSV, XLSX, and PDF
- Search specific drawer order reports.
- Scroll down to the bottom of the drawer’s report page.
- Click on the desired format option to export at the bottom right corner of the page.

Suppliers
- The supplier page shows all supplier's information with their total, paid, and pending amount records. You can add new suppliers, delete, edit, view payments, settle payments, and search for existing supplier records.
- Access Supplier Page
- Follow these steps to access the supplier page.
- Step 1: Choose Location
- Go to the location page www.foodnerdpos.com/manager/locations
- Choose a particular location.

- Step 2: Open Supplier Tab
- Click the “Sidebar” icon at the upper left corner of the page.
- Scroll down in the sidebar and click “Suppliers”.

- The “Suppliers” page will open with the following features and information:
- Search Filter
- Supplier Table
- Add Supplier
- Export Suppliers in CSV and XLSX format

- Add New Supplier
- Step 1: Open Supplier Form
- Click the “Add Supplier” button at the upper right of the supplier page.

- Step 2: Provide Supplier Details
- Enter the supplier name in the “Name” field.
- Provide supplier phone number without dashes.
- Enter the supplier’s address in “Address Line 1”.
- Enter the supplier's second address in the “Address Line 2”.
- Select country, state, and city.
- Click “Submit”.

- Search Supplier By Name, Pending, and Paid Amount
- Enter the supplier name in the “Name” field.
- Select the supplier amount type (pending or paid) from the dropdown.
- Click the “Search” button.

- Delete Supplier Record
- Locate the particular record entry supplier entry.
- Click the “Delete” option in the “Actions” column.

- Edit Supplier Record
- Step 1: Click Edit Option
- Locate the particular supplier entry from the table.
- Click the “Edit” option under the “Actions” tab.

- Upon doing so, the edit supplier page will open.
- Step 2: Update Basic Information
- Update the supplier name in the “Name” field.
- Update supplier phone number.

- Step 3: Update Address and Submit
- Update the address in the following address fields:
- Address Line 1*
- Address Line 2
- Update the country, state, and city
- Click the “Submit” button

- View Supplier Payment Details
- Locate the particular supplier entry
- Click the “Payments” option under the “Actions” tab

- The supplier payment table detail will display these pieces of information:
- Date (Payment entry date)
- Total Amount
- Already paid
- Pending amount
- Payment mode

- Settle Supplier Payments
- Follow these steps to settle supplier payments.
- Step 1: Open Settle Payment Page
- Locate a specific record of the supplier.
- Click the “Settle” option in the “Actions” column.

- Step 2: Settle Supplier Payment
- Enter or select the date in the “Date” field
- Enter the paid amount in the “Paid amount” field. (total, already paid, and pending fields will be filled and adjusted automatically)
- Select any of the following payment methods from the “Mode of Payment” dropdown
- Cash Credit, Card Bank, Deposit, Cheque, Others
- Click the “Submit” button

- Export Supplier Record in CSV and XLSX
- Open supplier record page
- Click on any of the following desired format buttons at the upper right side of the page:
- Export CSV
- Export XLSX

Activity
- The activity page shows all the user-performed activities including the location/store name, date and time, username, and action of the activity. You can search for a particular activity on this page.
- Access Activity Page
- Follow these steps to access the activity page.
- Step 1: Choose Location
- Go to the location page www.foodnerdpos.com/manager/locations
- Choose a particular location/store.

- Step 2: Open the Activity Page
- Click the “Sidebar Icon” at the top left corner of the page.
- Click the “Activity” tab in the opened sidebar.

- The “Activity” page will open and you will see the following features and information:
- Search filter
- Activity table
- The activity table will show the following pieces of information:
- Activity ID
- Item ID
- Item Type
- Item Title (Activity Performed on the Particular Item)
- Action (Description of Performed)
- Availability
- Location (Location/Store Name)
- User
- Created at

- Activity Search Filter
- Activity search filter searches the particular activity record based on the following information:
- Activity ID
- Traceback ID (Item ID)
- Item Type
- Action
- Search Activity By Activity ID
- Enter your activity ID in the “Activity ID” field.
- Click the “Search” button.

- Search Activity By Traceback ID (Item ID)
- Enter your item ID in the “Traceback ID” field.
- Click the “Search” button.

- Search Activity By Item Type
- Enter the item type in the “Item Type” field.
- Click the “Search” button.

- Search Activity By Action
- Enter the action name in the “Actions” field.
- Click the “Search” button.

- Export Activity Records in CSV, XLSX, and PDF
- Scroll down to the bottom of the activity page
- Click on any of the desired export formats (CSV, XLSX, or PDF ) at the bottom right corner of the page

Expenses
- Expenses are costs used from drawers (cashiers). It keeps the record of all outgoing cash from the drawer’s amount with the expense category, date, and drawer’s user name. You can add new expense records, search for the specific expense entry, and download the expense report.
- Access Expenses Page
- Follow these steps to access the “Expenses” tab:
- Step 1: Choose Location
- Go to the location page www.foodnerdpos.com/manager/locations
- Choose a particular location/store.

- Step 2: Open Expenses Tab
- Click the “Sidebar Icon” at the upper left corner of the page.
- Scroll down in the sidebar and click “Expenses”.
- Click “more” to view all report options.

- The “Manage Expenses” page will open with the following features and information:
- Search Filter
- Expense Table
- Download Report Option
- The expense table has the following pieces of information:
- Expense Date
- Categories
- Expense For
- Amount
- Note
- Created By
- Actions

- Add New Expense
- Follow these instructions to add a new expense entry to the table:
- Click the “Add Expense” button at the upper right side of the “Manage Expenses” page

- A “New Expense” page will open.
- Enter your following expense details in the form:
- Expense for
- Expense Date
- Amount
- Note
- Select the drawer from the “Drawers” dropdown
- Choose the expense category
- Click the “Create Expense” button

- Edit Expense Record
- Locate the specific expense record entry
- Click on the “Edit” icon in the “Actions” column

- Update any/all of the following required fields:
- Expenses for
- Expense date
- Amount
- note
- Update drawer from the “Drawers” dropdown
- Update expense category
- Click the “Create Expense” button

- Delete Expense Record
- Follow these steps to delete the expense record from the table
- Locate the specific expense entry.
- Click the “Delete” icon in the “Actions” tab.

- Caution: Be careful before using the delete option. Once the delete icon is clicked, the particular record will be deleted immediately without any confirmation.
- Search Expense Record
- The expense search filter allows you to search expense records for a specific time duration.
- Enter or select the “From” and “To” date and time.
- Click the “Search” button.

- Download Expense Report
- Click the “Download Report” button at the upper right side of the “Manage Expenses” page

- The expense report file will be downloaded!
Inventory Management
- The inventory page contains the record of stock items, stock purchases, and stock wastes of your location/restaurant. First, you have to add a new stock location on the stock location page. Then, select the particular stock location and add purchases. Similarly, add stock items and wastes for the selected stock location. This same pattern is followed even to view the purchases, stock items, and waste records for the particular stock location.
- Access Inventory Page
- Follow these steps to access the inventory page.
- Go to the location page www.foodnerdpos.com/manager/locations
- Click the “Inventory” option on the navigation bar.
- On the inventory page, you’ll see the following options on the navigation bar:
- Stock Locations
- Purchases
- Stock Item
- Wastes

- Stock Locations
- Stock location is simply a place from where we buy our stock. On the stock locations page, you can add new stock locations, view, edit, destroy, search, and export the existing stock locations records.
- The stock location table will have the following pieces of information:
- Location (your location/store name)
- Title (name of the stock location)
- Description
- Default (whether the stock location is default or not)
- Edit and Destroy options

- Add New Sock Location
- Step 1: Choose Location/Store
- Open the location page www.foodnerdpos.com/manager/locations
- Choose the particular stock location/store.

- Step 1: Click New Stock Location
- Click the “New Stock Location” button on the upper right.

- Step 2: Enter Stock Location Details
- Mark the “Default” checkbox if you want to declare it as a default stock location.
- Enter the “Title” of the stock location.
- Enter the stock location “Description”.
- Click the “Submit” button.

- Edit Stock Location
- Step 1: Click Edit Option
- Locate the particular stock location.
- Click on the “Edit” option under the “Default” column.

- Step 2: Update Information
- Check/Uncheck the “Default” checkbox.
- Update the stock location “Title”.
- Update stock location “Description”.
- Click the “Submit” button
- Destroy Stock Location
- Locate the particular stock location.
- Click the “Destroy” option.

- Search Stock Location
- Enter the “Title” of the stock location.
- Click the “Search” button.

- Export Stock Location Record in CSV, XLSX, and PDF
- Scroll down to the bottom of the stock location page.
- Click on any of the desired export formats (CSV, XLSX, or PDF ) at the bottom right corner of the page.

- Purchases
- The stock purchase page will show all the purchased stock items with their purchase title, total amount, and date. You can add new purchases, edit, destroy, search, and export the existing purchase record.
- View Stock Purchases
- Locate the particular stock location from the stock location page Stock Locations
- Click on the stock location “Title” link.

- Upon doing so, the stock purchases page will open with these features and information:
- Search Filter
- Stock Purchase Table
- The Stock purchase table will have the following pieces of information:
- Stock Purchases (name of the purchased item)
- Description
- Total Amount
- Purchase at
- Edit and Destroy Options

- Stock Purchase Search Filter
- Click the “Search Filter Icon” at the upper right side of the page
- Enter the stock purchase title in the “Title” field
- Enter or select the “Created After” and “Created Before” date
- Click the “Search” button

- Add Stock Purchase
- Step 1: Click New Stock Purchase
- Click the “New Stock Purchase” button at the upper right side of the page

- Step 2: Enter the Stock Purchase Detail
- Enter the type of stock purchases
- Select the “Purchase at” date
- Enter purchase description
- Select an ingredient from the drop-down
- Enter the ingredient quantity
- Select ingredient unit
- Enter “Unit Price” and “Adjusted Price”
- Enter the tax on purchase, discount, and reserved quantity of the ingredient
- Click the “Add stock Item” and fill in the same form if purchasing more than 1 ingredients
- Enter other charges on purchase and select the charge type
- If you want to pay the supplier payment, check the “Relate Supplier” checkbox
- Select a specific supplier from the dropdown
- Enter the Paid Amount” in the provided field. (total and pending amounts will be filled and adjusted automatically)
- Select the payment method and enter additional notes
- Click the “Submit” button

- Edit Stock Purchase
- Step 1: Click Edit Option
- Locate the particular stock purchase
- Click the “Edit” option

- Step 2: Edit Stock Purchase
- Perform any of the following operations:
- Update the type of stock purchases
- Update the “Purchase at” date
- Update purchase description
- Update ingredient from the drop-down
- Update the ingredient quantity
- Update ingredient unit
- Update “Unit Price” and “Adjusted Price”
- Update tax on purchase, discount, and reserved quantity of the ingredient
- Update other charges on purchase and the charge type
- Add/Update the supplier from the dropdown (if added)
- Update supplier “Total amount”, “Paid amount”, and “Pending amount”
- Update the payment method and additional notes
- Click the “Submit” button

- Delete Stock Purchase
- Locate the particular stock purchase
- Click the “Destroy” option

- Export Stock Purchase Records in CSV, XLSX, and PDF
- Scroll down to the bottom of the stock purchase page
- Click on any of the desired export formats (CSV, XLSX, or PDF ) at the bottom right corner of the page

- Stock Items
- The stock items page shows all the purchased stock item’s records with stock location name, item name, purchased quantity, purchased cost, consumed quantity, wasted quantity, wasted cost, remaining cost, reserved quantity, and measurement unit. You can add new stock items, edit, destroy, search, and export existing stock item records.
- View Stock Items
- Make sure you are opening stock items for the selected stock locations (as explained in the above section).
- Click the “Stock Item” option from the navigation bar.

- Search Stock Items
- Click the “Search Filter Icon” at the upper right side of the page
- Enter the ingredient name in the “Ingredients” field
- Select stockable type from the “Stockable Type” dropdown
- Enter or select the “Created After” and “Created Before” date
- Click the “Search” button

- Add New Stock Item
- Step 1: Click Add New Stock
- Click the “New Stock Item” button at the upper right side page.

- Step 2: Enter Stock Item Details
- Select an ingredient from the dropdown
- Select the unit of the stock item
- Enter the purchased quantity of the item
- Enter purchased cost, wasted cost, and reserved quantity of the stock item
- Select the stockable type and click the “Submit” button

- Edit Stock Items
- Step 1: Click Edit Option
- Locate the particular stock item entry
- Click the “Edit” button

- Step 2: Edit Stock Item Details
- Perform any of the following operations:
- Update ingredient from the dropdown
- Update the unit of the stock item
- Update the purchased quantity of the item
- Update the purchased cost, wasted cost, and reserved quantity of the stock item
- Update the stockable type and click the “Submit” button

- Destroy Stock Items
- Locate the particular stock item entry
- Click the “Destroy” option
- Click “OK” to confirm the destroy action

- Export Stock Items in CSV, XLSX, and PDF
- Scroll down to the bottom of the stock item page
- Click on any of the desired export formats (CSV, XLSX, or PDF ) at the bottom right corner of page

- Wastes
- The wastes tab shows the record of wasted stock items details with the item name, date, measurement unit, and wasted cost, You can add new stock waste items, edit, destroy, search, and export the existing waste item records.
- View Stock Wastes
- Make sure you’re opening stock items for the selected stock locations (as explained in the above section).
- Click the “Wastes” option from the navigation bar.

- Search Stock Wastes
- Click the “Search Filter” icon
- Enter the item name in the “Item Name” field
- Select the stock type from the “Stockable Type” dropdown
- Enter or select the “Created After” and “Created Before” date
- Click the “Search” button
- Add New Stock Waste
- Step 1: Click New Stock Wastes
- Click the “New Stock Wastes” button at the upper right of the page

- Step 3: Enter Stock Wastes Details
- Select the “Wasted At” date
- Select the item name from the dropdown list
- Enter the quantity of the wasted item
- Select the unit of the wasted item
- Click the “Submit” button

- Edit Stock Item Wastes
- Step 1: Click Edit Option
- Locate the particular stock item waste entry
- Click the “Edit” button

- Step 2: Edit Stock Item Details
- Perform any of the following operations:
- Update “Wasted At” date
- Update stock item name
- Update the unit of the wasted item
- Click the “Submit” button

- Destroy Stock Item Wastes
- Locate the particular stock item waste entry
- Click the “Destroy” option
- Click “OK” to confirm the destroy action

- Export Stock Item Wastes in CSV, XLSX, and PDF
- Scroll down to the bottom of the stock item waste page
- Click on any of the desired export formats (CSV, XLSX, or PDF ) at the bottom right corner of the page

Reports
- The “Reports” page shows different reports records such as items, menus, orders, rejections, ingredients, employee commission, supplier due, supplier ledger, purchase, profit and loss, stock item, and stock items waste reports.
- In each report, you can search records, and export reports in CSV, XLSX, and PDF formats:
- CSV (Comma Separated Values) is the file containing data separated by commas
- XLSX (Excel Spreadsheet) is the file containing data in tabular format
- PDF (Portable Document Format) is a file containing data in printable format
- Access Reports Page
- Follow these steps to access the reports page:
- Step 1: Open Location/Store
- Go to the location page Locations
- Click on the particular location/store

- Step 2: Open Reports
- Click the “Sidebar Icon” at the upper left corner of the page.
- Navigate to the sidebar and click “Reports”.
- Click “More” to view all report options.

- The “Reports” page will open with various report options:

- Items Report
- Item report shows the sales record of all the sold items including name, quantity, amount, wasted cost, purchased cost, and profit earned. Additionally, you’ll see the overall total amount, total cost, and total profit earned for all sold items in the item sales report table.
- Navigate to the “Reports” page and click the “Items Reports” option.

- An “Item Sales Report” page will open with the following features and information:
- Search Filter
- Item Report Table
- The item report table has the following pieces of information:
- Name
- Count
- Amount
- Discount
- Wasted cost
- Cost
- Profit

- Item Sales Report Search Filter
- Search Item Sale By Name
- Follow these steps to search for any item by its name:
- Enter your item name in the “Item name” field.
- Press enter from your keyboard.

- Search Item Sales Report For Specific Time-Duration
- The search filter allows you to narrow down your item sales report based on specific criteria.
- Follow these steps to use the item's sales report search filter:
- Click the “Search Filter” icon at the upper right side of the screen
- Enter or select the “From” and “To” date and time.
- Select the order state from the “State” drop-down.
- Select your menu item from the “Menus” dropdown.
- Select the specific user from the “User” dropdown
- Click the “Search” button.

- Export Items Sales Report in CSV, XLSX, and PDF
- Follow these steps to export the items sales report in CSV, XLSX, and PDF format:
- Scroll down to the bottom of the items sales report page
- At the bottom right corner of the page, you will see the following export option:
- CSV, XLSX, PDF
- Click any of the desired formats to export items sales report

- Menus Report
- Menus report shows the sales record of all menus sales report including item quantity, total amount, wasted cost, purchase cost, and profit earned. Moreover, you’ll see the overall total menu item amount, purchased cost, and total profit earned.
- Take a look at this step to see the menu sales report:
- Navigate to the “Reports” page and click the “Menus Report” option

- A “Menus Sales Report” page will open with the following features and information:
- Search Filter
- Menus Sales Report Table
- The menu sales report table will display these pieces of information:
- Name
- Count (total of each item count)
- Amount
- Wasted Cost
- Cost
- Profit

- You can click on any of the desired menu names to view each menu item sales report:
- Menu Sales Report Search Filter
- Search Menus Sales By Menu Name
- Follow these steps to search any menu by its name:
- Enter the name of the menu in the “Menu Title” field
- Press enter from your keyboard

- Menu Sales Report For Specific Time-Duration
- The search filter allows you to narrow down your menus sales report based on specific criteria. Follow these steps to use the menu sales report search filter:
- Click the “Search Filter” icon on the right side of the page.
- Enter or select the “From” and “To” date and time.
- Select the order state from the “State” dropdown.
- Select the specific user from the “User” dropdown list.
- Click the “Search” button.

- Export Menu Sales Report in CSV, XLSX, and PDF
- Follow these steps to export the menu sales report in CSV, XLSX, and PDF format:
- Scroll down to the bottom of the menu sales report page
- At the bottom right corner of the page, click any of the desired formats to export items sales report:
- CSV, XLSX, PDF

- Orders Report
- Orders report shows all order sales with order number, order type, tax, fees, service, and delivery charges, total order cost, purchased cost, and profit earned. Additionally, you’ll see the overall total sales for all orders.
- Follow this step to view the orders sales report:
- Navigate to the “Reports” page and click the “Orders Report” option

- The “Order Sales Report” page will open with the following features and information:
- Search Filter
- Orders Sales Table
- The order sales table has the following pieces of information:
- Order Number
- Created at
- Order at
- Completed at
- Channel (Channel Name Through Which the Order was Placed)
- Type (Order Types like Pickup, Eat-in, or Delivery)
- Item Total (total items cost)
- Delivery Charges
- Tax on Order
- Discount
- Fees (Delivery and Service Charges)
- Total (Total Customer Cost)
- Cost (Total Purchased Cost of the Order)
- Profit (Total - Cost)

- Order Sales Report Search Filter
- Search Orders Sales By Order Number
- Follow these steps to search any order by its order number:
- Enter your order number in the “Order No” field
- Press enter from your keyboard

- Search Order Sales Report For Specific Time-Duration
- The search filter allows you to narrow down your order sales report based on specific criteria. Follow these steps to use the full search filter in the order sales report:
- Click the “Search Filter” icon on the right side of the page.
- Enter or select the “From” and “To” date-time.
- Select users from the “Users” dropdown.
- Select the order type from the “Type” dropdown.
- Select the channel name from the “Channel” dropdown.
- Select the particular employee from the “Employee” dropdown.
- Select the state of the order from the “State” dropdown.
- Select the specific drawer from the “Drawer” dropdown.
- Select the payment method from the “Payments” dropdown.
- Choose the particular shift from the “Shift” dropdown.
- Click the “Search” button.

- View Order Details
- Locate the specific order from the table.
- Click on the order number link.

- View Total Order Sales
- At the top of the order sales table, you’ll see the total sales on the left side and the total number of orders on the right side.
- Click the “View More” button to view total sales details.
- Total sales are the sum of the following costs:
- Total Item Sales
- Total Discount
- Total Fees (Service +Delivery Charges)
- Total Tax
- Total Dues (Partial Order payments)

- Export Order Sales Report in CSV, XLSX, and PDF
- Follow these steps to export the order sales report:
- Scroll down to the bottom of the order sales report
- You will see the following export options at the bottom right corner of the page:
- CSV, XLSX, PDF
- Click on any of the desired format options to export order sales record

- Rejection Report
- Rejection report shows all rejected order reports with date-time stamp, amount, and reason for the rejection.
- Follow this step to view the rejected orders:
- Navigate to the “Reports” page and click the “Rejection Report” option

- The “Rejected Order” page will open with the following features and information:
- Search Filter
- Rejected Order Table
- The rejected order table has the following pieces of information:
- Order Id
- Date and Time
- Channel
- Type
- Amount
- Reason

- Rejection Order Search Filter
- Search Rejected Order By Order No
- Follow these steps to search rejected orders by their order number:
- Enter your order number in the “Order No” field
- Press enter from your keyboard

- Search Rejected Order For Specific Time Duration
- The search filter allows you to narrow down your rejected order report based on specific criteria. Follow these steps to use the search filter for rejected orders:
- Click the “Search Filter” icon at the upper right side of the page
- Enter or select your “From” and “To” date and time
- Click the “Search” button

- Export Rejected Order in CSV, XLSX, and PDF
- Follow these steps to export the rejected orders report in CSV, XLSX, and PDF format:
- Scroll down to the bottom of the rejected order page
- At the bottom right corner of the page, you will see the following export option:
- CSV, XLSX, PDF
- Click any of the desired formats to export the rejected order report

- Ingredients
- Ingredient report shows how much quantity of the particular item has been consumed along with their menu name. Follow this step to view ingredient details:
- Navigate to the “Reports” page and click the “Ingredients” option.

- The “Order Item Ingredients” page will open with the following features and information:
- Search Filter, Ingredients table
- The ingredients table will display the following pieces of information:
- Ingredients Name
- Menu Item (Ingredients Belong to particular Menu)
- Consumed Quantity
- Consumed Unit (Quantity Measurement)

- Ingredients Search Filter
- Search Ingredients By Name. Follow these steps to search for any ingredients by their name:
- Enter your ingredient name in the “Ingredient name” field
- Press enter from your keyboard

- Search Ingredient For Specific Time Duration
- Follow these steps to use the full search filter for Ingredients:
- Click the “Search Filter” icon at the upper right side of the page
- Enter or select your “From” and “To” date and time
- Click the “Search” button

- Employee Commission Report
- Employee commission report shows the employee’s earned commission against orders either in flat price or commission percentage, whatever is set. Apart from that, you’ll see the overall total amount order, total paid, and payable amount to the employees. Follow the following step to view the commission report record:
- Navigate to the “Reports” page and click the “Employee Commission Report” option

- The “Employee Commission Report” page will open with the following features and information:
- Search Filter
- Employee Commission Report Table
- The employee commission report table will show the following pieces of information:
- ID (Order ID)
- Completed at
- Amount (Total Cost of the Order)
- Commission Rate
- Order Commission (Employee’s Earned Commission Based on the Commission Rate)

- Employee Commission Report Search Filter
- Search Commission Report By Name
- Follow these steps to search for any commission report record by employee name:
- Enter your ingredients name in the “Ingredient name” field
- Press enter from your keyboard

- Search Commission Report For Specific Time Duration
- Follow these steps to use the full search filter for the commission report:
- Click the “Search Filter” icon at the upper right side of the page
- Enter or select your “From” and “To” date and time
- Select the particular employee from the “Employee” dropdown
- Click the “Search” button

- Export Commission Report Record in CSV, XLSX, and PDF
- Follow these steps to export the commission report record in CSV, XLSX, and PDF format:
- Scroll down to the bottom of the employees commission report page
- At the bottom right corner of the page, you will see the following export option:
- CSV, XLSX, PDF
- Click any of the desired formats to export commission report record

- Supplier Due Report
- Supplier due report shows the supplier information along with the payable amount for the purchase stock. Follow this step to view the supplier due report:
- Navigate to the “Reports” page and click the “Supplier Due Report” option.

- The “Supplier Due Report” page will open with the following things:
- Search Filter
- Supplier Due Report Table
- The supplier due report table will show the following pieces of information:
- Name
- Payable Amount

- Supplier Due Report Search Filter
- Search Supplier By Name. Follow these steps to search supplier by its name:
- Enter the name of the supplier in the “Name” field
- Press enter from your keyboard

- Search Supplier For Specific Time Duration
- Follow these steps to use the full search filter for supplier due report:
- Click the “Search Filter” icon at the upper right side of the page
- Enter or select your “From” and “To” date and time
- Select the particular supplier from the “Supplier” dropdown
- Click the “Search” button

- Export Supplier Due Report in CSV, XLSX, and PDF
- Follow these steps to export the supplier due report in CSV, XLSX, and PDF format:
- Scroll down to the bottom of the supplier due page
- At the bottom right corner of the page, you will see the following export option:
- CSV, XLSX, PDF
- Click any of the desired formats to export supplier due record

- Supplier Ledger Report
- Supplier ledger report shows the information about the purchased stock along with their total, paid, and payable amount to the supplier. Follow this step to view the supplier ledger report:
- Navigate to the “Reports” page and click the “Supplier Ledger Report” option

- The “Supplier Ledger Report” page will open with the following features and information:
- Search Filter
- Supplier Ledger Report Table
- The supplier ledger report table has the following pieces of information:
- Purchase Date
- Purchase Title
- Purchase Amount
- Paid Amount
- Payable Amount

- Supplier Ledger Report Search Filter
- Search Supplier Ledger Record By Supplier Name. Follow these steps to search ledger record by supplier name:
- Enter the name of the supplier in the “Name” field
- Press enter from your keyboard

- Supplier Ledger Record For Specific Time Duration
- Follow these steps to use the full search filter for supplier due report:
- Click the “Search Filter” icon at the upper right side of the page
- Enter or select your “From” and “To” date and time
- Select the particular supplier from the “Supplier” dropdown
- Click the “Search” button

- Export Supplier Ledger Report in CSV, XLSX, and PDF
- Follow these steps to export the supplier ledger report in CSV, XLSX, and PDF format:
- Scroll down to the bottom of the supplier ledger report page
- At the bottom right corner of the page, you will see the following export option:
- CSV, XLSX, PDF
- Click any of the desired formats to export the supplier ledger report.

- Purchase Report
- Purchase report shows the information of purchased item stock including stock item name, quantity, measurement unit, cost per unit, and total purchased cost. Follow this step to view the purchase report record:
- Navigate to the “Reports” page and click the “Purchase Report” option

- The “Purchase Report” page will open and have the following features and information:
- Search Filter
- Purchase Report Record Table
- The purchase report table will have the following pieces of information:
- Purchased at
- Stockable Type
- Stock Location
- Supplier
- Name (Stock Item Name)
- Unit (Measurement Unit)
- Purchased Cost Per Unit
- Purchased Quantity
- Total (Total Purchased Unit Price)

- Purchase Report Search Filter
- Search Purchase Report By Name. Follow these steps to search purchase report by name:
- Enter the name of the stock in the “Name” field
- Press enter from your keyboard

- Purchase Report Search Filter
- Follow these steps to use the full search filter for the purchase report:
- Click the “Search Filter” icon at the upper right side of the page
- Enter or select your “Created After” and “Created Before” date and time
- Select the stock type from the “Stockable Type” dropdown
- Select the stock location from the “Stock Location” dropdown
- Select the supplier name from the “Supplier” dropdown
- Click the “Search” button

- Export Purchase Report in an Excel File
- Follow these steps to export the purchase report record in an Excel file:
- Click the “Export To Excel” button at the upper right side purchase report page.

- Profit and Loss Report
- Profit and loss report shows the overall purchase (waste, tax, discount, and expenses costs) and sales (item sales, tax, discount, gross and net profit). Follow this step to view the profit and loss report:
- Navigate to the “Reports” page and click the “Profit and Loss Report” option.

- The “Profit and Loss Report” page will open with the following features and information:
- Search Filter
- Purchase Record
- Sales Record
- Net Profit
- Purchase
- The “Purchase” section will have the following types of costs:
- Total Purchase Cost
- Total Waste Cost
- Total Purchase Tax Cost
- Total Other Charges of Purchased Cost
- Total Discount on the purchase
- Total Expense

- Sales
- The “Sales” section will show the following types of sales costs:
- Total Item Sales
- Total Sales Tax
- Total Other Charges of Sales
- Total Discount on Sales
- Gross Profit
- Net Profit

- Profit and Loss Report Search Filter
- Follow these steps to use the profit and loss search filter:
- Enter or Select the “From” and “To” date
- Click the “Search” button

- Export Profit and Loss Report in PDF
- Follow this instruction to export the profit and loss report in PDF file format:
- Click the “Export to PDF” button at the top right side of the “Profit and Loss Report” page

- Stock Item Report
- The stock items report page shows all the purchased stock item’s records with stock location name, item name, purchased quantity, purchased cost, consumed quantity, wasted quantity, wasted cost, remaining cost, reserved quantity, and measurement unit. Follow this step to view the stock items report:
- Navigate to the “Reports” page and click the “Stock Item Report” option

- The “Stock Item” page will open with the following features and information:
- Search Filter
- Stock Items Record Table
- The stock item report table will have the following pieces of information:
- Location (Store/Location Name)
- Stock Location
- Item (Item Name)
- Purchased Quantity
- Purchased Cost
- Current Cost/Unit
- Consumed Quantity
- Wasted Quantity
- Remaining Quantity
- Remaining Cost
- Reserved Quantity
- Unit (Measurement Unit)

- Stock Item Search Filter
- Search Stock Item By Name. Follow these steps to search the stock items by their name:
- Enter the item name in the “Ingredient name” field
- Press enter from your keyboard

- Search Stock Item For Specific Time Duration
- Follow these steps to use the full search filter for the stock item report:
- Click the “Search Filter” icon at the upper right side of the page
- Select the stock type from the “Stockable Type” dropdown
- Enter or select your “Created After” and “Created Before” date and time
- Select the stock location from the “Stock Location” dropdown
- Click the “Search” button

- Export Stock Item Report in CSV, XLSX, and PDF
- Follow these steps to export the stock item record in CSV, XLSX, and PDF format:
- Scroll down to the bottom of the stock item page
- At the bottom right corner of the page, you will see the following export option:
- CSV, XLSX, PDF
- Click any of the desired formats to the export stock item record

- Stock Item Wastes Report
- Stock item wastes report shows information about wasted items with quantity and wasted cost. Follow these steps to view the stock item waste report:
- Navigate to the “Reports” page and click the “Stock Item Wastes Report”

- The “Stock Items Wastes” page will open with the following features and information:
- Search Filter
- Stock Item Wastes Report Table
- The stock item wastes report table has the following pieces of information:
- Item (Item Name)
- Wasted at
- Unit (Measurement Quantity)
- Wasted Cost

- Stock Item Wastes Search Filter
- Search Stock Item Wastes By Item Name. Follow these steps to search stock item wastes by item name:
- Enter the name of the item “Item” field.
- Press enter from your keyboard.

- Stock Item Wastes For Specific Time Duration
- The search filter allows you to narrow down your stock item wastes report based on specific criteria. Follow these steps to use the full search filter for the stock item wastes report:
- Click the “Search Filter” icon at the upper right side of the page
- Select the stock type from the “Stockable Type” dropdown
- Enter or select your “Created After” and “Created Before” date and time
- Select the stock location from the “Stock Location” dropdown
- Click the “Search” button

- Export Stock Item Wastes Report in CSV, XLSX, and PDF
- Follow these steps to export the stock item wastes record in CSV, XLSX, and PDF format:
- Scroll down to the bottom of the stock item wastes page
- At the bottom right corner of the page, you will see the following export option:
- CSV, XLSX, PDF
- Click any of the desired formats to the export stock item wastes record


Orders
- In the order section, you can see newly created orders, order sales reports, incoming and completed orders. All orders having errors or not processed due to any reason will display on the incoming order page. Let’s say your order limit exceeds and you’re creating a new order, it will be shown on the incoming orders page.
- Step 1: Choose Location
- Go to the location page Manager/locations
- Choose the particular location

- Step 2: Access Orders
- Click the “Sidebar Icon” at the upper left corner of the page
- Click “Orders”
- Upon clicking “Orders”, you’ll see the following options:
- New Order
- Sale Order
- Incoming Order
- Completed Orders

- Sale Order
- Orders report shows all order sales with order number, order type, tax, fees, service, and delivery charges, total order cost, purchased cost, and profit earned. Additionally, you’ll see the overall total sales for all orders. You can search, view order details and total order sales, and export sales reports in CSV, XLSX, and PDF format.

- Search Order Sales By Order Number
- Follow these steps to search any order by its order number:
- Enter your order number in the “Order No” field
- Press enter from your keyboard

- Search Order Sales Report
- Click the “Search Filter” icon on the right side of the page
- Enter the order number in the “Order No” field
- Enter or select the “From” and “To” date-time
- Select users from the “Users” dropdown from
- Select the order type from the “Type” dropdown
- Select the channel name from the “Channel” dropdown
- Select the particular employee from the “Employee” dropdown
- Select the state of the order from the “State” dropdown
- Select the specific drawer from the “Drawer” dropdown
- Select the payment method from the “Payments” dropdown
- Choose the particular shift from the “Shift” dropdown
- Click the “Search” button

- View Order Details
- Locate the specific order from the table.
- Click on the order number link.

- View Total Order Sales
- Click the “View More” button to view total sales details

- Total sales are the sum of the following costs:
- Total Item Sales
- Total Discount
- Total Fees (Service +Delivery Charges)
- Total Tax
- Total Dues (Partial Order payments)

- Export Order Sales Report in CSV, XLSX, and PDF
- Scroll down to the bottom of the order sales report
- You will see the following export options at the bottom right corner of the page:
- CSV, XLSX, PDF
- Click on any of the desired format options to export order sales record

- Completed Order
- On the completed order page, you can search for the completed orders, view completed order details, and export or print completed order details.

- Search Completed Orders
- Enter your completed order number in the “Orders” field
- Enter or select the “From” and “To” date
- Click the “Search” button

- View Completed Orders Details
- Locate the specific completed order
- Click on the order to view its details

- Export or Print Completed Order Details
- Click on the particular order
- Upon clicking, you’ll see the following two options on the right side:
- PDF, Print Icon
- Click on the “PDF” to download the PDF file of the completed order
- Click the “Print Icon” to print the completed order receipt

Financials
- In Financials, you can see subscribed package details and invoices for your subscriptions. You upgrade your subscription plan, add add-ons, or renew the package subscription. Furthermore, you can search for specific invoices and export invoice records in XLSX, CSV, and PDF format.
- Step 1: Choose Location
- Go to the location page Manager/locations
- Click the particular location/store

- Step 2: Open Financials Tab
- Click the “Sidebar Icon” at the top left corner of the page
- Scroll down in the opened sidebar and click the “Financials” tab
- Upon clicking the “Financials”, you will see the following two options:
- Invoices, Package

- Invoices
- The “Invoices” page has receipts of all the purchased subscriptions. In the invoices table you will see the following pieces of information:
- Title
- Start Date
- End Date
- Amount
- Paid (Payment Status)
- Actions (To View Invoice Details)

- Search Invoice
- Follow these steps to search for a specific invoice:
- Click the “Invoices” dropdown.
- Enter your invoice title in the “Title contains” field.
- Choose the invoice status paid or unpaid.
- Select the start and end date.
- Click the “Submit” button.

- View Invoice Detail
- Follow these steps to view the invoice details:
- Locate the particular invoice from the table.
- Click the “View Invoice” link under the “Actions” column.

- The invoice receipt of your subscription plan will be opened:

- Packages
- The “Packages” page shows the details of all active packages of the user under the “Active Packages” section:

- Upgrade/Renew Package
- Follow these steps to upgrade your subscription plan:
- Step 1: Choose Package
- Scroll down on the “Packages” page.
- Select the specific plan to upgrade.

- Step 2: Select Addons (Optional)
- scroll down to the page and select the desired addons as per your need.

- Step 3: Review Cart and Submit
- Review your package and addons details to the cart
- The payment method will be “Cash” by default
- Click the “Submit” button

- Update Subscribed Location
- Follow these steps to update your subscribed location
- Step 1: Choose Package
- Choose your subscription package.
- Click the “Update Subscribed Locations” option.

- Step 2: Update Subscribed Location
- Choose your updated location from the available dropdown.
- Click the “Subscribe” button.

Order Tax Invoices
- Order tax invoices page shows details of the tax against orders with the order number, reporting response from the tax authorities, and status. On this page, you’ll see the following types of order tax invoices:
Types Response Code/Response Body Success 100 code Failed 104 or above code Unprocessed Empty Response code and Body No Tax Invoice Empty Response code and Body - Step 1: Choose Location
- Go to the location page Manager/locations
- Click the particular location/store
- Step 2: Access Orders
- Click the “Sidebar Icon” at the upper left corner of the page
- Click “Orders Tax Invoices”

- Upon doing so, the order tax invoices page will open with the following pieces of information:
- Order Number
- Number
- Reporting Response Code
- Reporting Response Body
- Status

- Search Order Tax Invoice
- Enter your order number in the “Order No” field
- Select any of the following invoice types from the dropdown:
- All, Failed, Unprocessed, No Tax Invoice
- Click the “Search” button.

- Failed Order Tax Invoices
- Failed order tax invoices will show the reporting response body code 104 or higher:

- Unprocessed/No Tax Invoice
- Unprocessed/No tax Invoice will show the empty reporting/response body:

Printer Settings
- You can add two types of printer settings either Wi-Fi or USB. For Wi-Fi printer settings, you’ve to provide the printer’s IP address and port number. Then, select the paper roll. For USB-type printers, choose the printer from the available options, allow access, and select the paper roll.
- Add Wi-Fi Printer Settings
- Follow these steps to add new Wi-Fi printer settings.
- Step 1: Select Your Location/Store
- Go to the location page Manager/locations
- Click the particular location/store
- Step 1: Open Printer Settings
- A home page of your selected location will open:
- Click the “Sidebar Icon” at the top left corner of the page
- Click on “Settings” in the opened sidebar menu
- Click the “Printer Settings” option.

- Step 2: Choose Wi-Fi Printer Type
- Enter “1” for Wi-Fi printer type.
- Press enter or click “OK”.

- Step 3: Enter Printer IP Address
- Enter the IP address of your printer.
- Press enter or click “OK”.

- Step 4: Enter Port Number
- Enter the port number for your printer.
- Press enter or click “OK”.

- Step 5: Select Paper Roll
- Select your desired paper roll type 1(80mm) or 2(58mm).
- Press enter or click “OK”.

- Add USB Printer Settings
- Follow these steps to add USB printer settings to your location/store.
- Step 1: Choose USB Printer Type
- Enter “2” for USB printer type.
- Press enter or click “OK”.

- Step 2: Allow Permission
- Allow the necessary permissions for USB-type printers.

- Step 3: Select USB Printer
- A dialog box will appear with all available printers.
- Choose the specific printer i.e. 1, 2, or 3.
- Press enter or click “OK”.

- Step 4: Choose Paper Roll
- Select your desired paper roll type 1(80mm) or 2(58mm).
- Press enter or click “OK”.

User Management
- The user management section has two options: “Users” and “Roles and Permissions”. On the users page, you can manage all users including create, edit, delete, and assign roles operations. On the roles and permissions page, you can manage all user permissions including adding new permissions, assigning roles to the users, editing and deleting permissions roles operations.
- Follow these steps to access the user management.
- Step 1: Choose Location
- Go to the location page Manager/locations
- Click the particular location/store
- Step 2: Open User Management
- Click the “Sidebar Icon” at the upper left corner of the page.
- Navigate to the sidebar and click “User Management”.
- Upon clicking, you’ll see the following 2 options
- Users, Roles and Permissions

- Users
- On the user page of your location, you’ll see the following features and information:
- Search Filter
- Users Records
- Add New User
- On the user page of your location, you’ll see the following features and information:
- User (User ID)
- Parent (Main User of Location)
- Role
- Expiration (Expire Date)

- Add New User
- Follow these steps to add a new user.
- Step 1: Click New User
- Click the “New User” button at the upper right of the page

- Step 2: Enter User Details*
- Enter the user's email address in the “Email” field.
- Choose the user role from the drop-down list.
- Enter the user expiration date.
- Enter the user’s first and last name.
- Enter the user’s password and confirm it.
- Click the “Submit” button.

- Note: You can’t add users more than the number included in your subscription plan. For more users, you either have to upgrade your subscription plan or purchase addons.
- Search User
- Enter user-id in the “User ID” field.
- Click the “Search” button.

- Edit User
- You can only update the user role and expiration date. Follow these instructions to edit user details.
- Step 1: Click Edit Option
- Locate the particular user entry.
- Click the “Edit” option.

- Step 2: Update User Details
- Update the user role and expiration date.
- Click the “Submit” button.

- Remove User
- Locate the particular user entry.
- Click the “Remove” option.

- Roles and Permissions
- On the roles and permission page of your location, you’ll see the following features and information:
- Search Filter
- Roles and Permission Table
- Add New Role and Permissions
- The roles and permission table will show these details:
- Id (User ID)
- Role Name
- Description

- Add New Role
- Follow these steps to add a new role.
- Step 1: Click Add New
- Click the “Add New” button at the upper right side of the page.

- Step 2: Enter Role Details and Select Permissions
- Enter the new title role in the “Title” field.
- Enter the description of the new role.
- Mark the checkboxes for the required permission for the new role.

- After selecting all required permissions, click the “Save” button.

- Change User Role
- Follow these steps to change the assigned role for users.
- Step 1: Click the User Icon
- Locate the particular role entry.
- Click the “User Icon” in the “Actions” column.

- Step 2: Select Other User
- Select the user from the dropdown list.
- Click the “Submit” button.

- Edit Roles
- Step 1: Click Edit Icon
- Locate the particular role entry.
- Click the “Edit Icon” in the “Actions” column.

- Step 2: Update Roles Info
- Update the role information such as title, description, and required permissions:

- After updating, click the “Save” button.

- Delete Roles
- Locate the particular role entry.
- Click the “Delete Icon” in the “Actions” column.